Categories
Content Ideas Library News Tutorial

Add a Slideshow

Corning City Library has a really great photo slideshow in their sidebar that they created using an online service called Slide (they used another online product a few years ago, but like this one better.)

To create this, you can sign up for a free account or just start arranging a slideshow.  You can pull photos from your computer, a Flickr account, photobucket, FaceBook or elsewhere.  There are easy-to-follow instructions on the screen for customizing and re-sizing your slideshow, and then ‘saving’ the show.

Along with ‘saving’ your work, you are given options for where and how to share your slideshow.  If you want the slideshow to appear in a sidebar of your site, I recommend skipping down to the ‘Can’t find what you’re looking for’ link to get the HTML embed code you will need to put into a text widget.  Pretty easy and neat looking.

Here’s an updated example featuring my attempt at a garden.  I sized this at 150 pixels wide to fit in a sidebar, you can chose a larger size if you want this to appear in a Post or on a Page of your site:
Categories
Content Ideas Tutorial

Adding a Flickr Slideshow

Maybe you saw the lovely slideshow at the Kansas Library Express site?  Heather Braum and Carolyn Little figured out how to do that last night in the NEKLS training lab.

How they did it:

  1. Went to the Kansas Library Express Flickr account
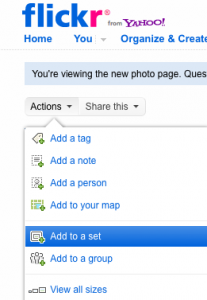
  2. From the Photostream, they opened up certain pictures and clicked “Actions” and “Add To Set” and created a new Set called ‘July 2010 Courier Photos’
    (OK, I don’t know immediately how to get into the nekls Flickr account, so I’m going to use screenshots from my personal account – the buttons and links are all located in the same places.)
  3. From the Photostream, they opened that Set by clicking on “Sets” and then selected “July 2010 Courier Photos”
  4. Now, up in the right corner in gray text is a link called “Slideshow” – they clicked that!
  5. This opened the slideshow in their Web browser.  To share that in a post on a WordPress blog, they clicked “Share
  6. For a KLOW site, they needed to embed the HTML code into a Post using the HTML editor, so they selected “Copy to Clipboard” under the ‘Grab the embed HTML’ and took this information back to the Kansas Library Express site and pasted it into the empty post!
    (This illustration shows the difference between a wordpress.com site and a wordpress.org, or KLOW, site).

OK, so I’m confident in your ability to open a new post, select the HTML tab to open the HTML editor and ‘ctrl+v’ (paste) in that code that is on your computer clipboard.

I look forward to seeing more embedded Flickr slideshows!
-Sharon

Categories
Tutorial

The First Three Things

In the interest of helping out all of our trainers, we’ve come up with a short video on how to do the first few important steps on a new KLOW site.

The steps are:

  1. Log in
  2. Change your contact information (name and e-mail)
  3. Set the name and tagline of your blog
Categories
Tutorial

Awesome Short Training Videos

George from seehowtwo.com writes:

Saw that you’re letting members know about websites to help with WordPress.  I’ve got a tutorial site covering WP 2.6 (and 2.7) – each video is under 2 minutes.  We’ll be adding more videos about the web and computing later, but right now we’re focusing on WordPress because we love it so much!

We love it too, George! Thanks for letting us know about your awesome videos.

Some specific videos that I think will definitely help you all:

These highlighted videos are for WordPress 2.6 (what the KLOW sites run). See all of the available videos!

Here is the link to the 2.7 videos, which we will be transitioning to at a later date.

Categories
Tutorial

Add a search box to the State Library of Kansas Databases

Ever wanted to make a page devoted to resources external to your library? Resources such as the State Library of Kansas sponsored databases?

Oh you have, have you? Well funny you should ask… here’s how you do it!

  1. Log into the administration side of your site.
  2. Click Presentation
  3. Click Widgets
  4. Find an empty Text widget
    • If you don’t have a blank one, scroll down and increase the number of text widgets that are displaying, and click Save. Then use one of the new ones you’ll see in your “Available Widgets” box.
  5. Drag it up to one of your sidebars.
  6. Click the “Configure” box on the right end of the text widget you dragged up. A pop up will appear with a blank white area.
  7. Copy the following text and paste it into the box:
    <form method="post" action="http://ksuc-agent.auto-graphics.com/homepages/customerwide/ValidateGlobalIP.asp?cuid=ksuc&amp;lid=kw9&amp;stfftype=Z&amp;defaultlang=english&amp;qmisc=&amp;s=ESS&amp;mode=S">&nbsp;<input name="term" type="text" size="18" />
    <p></p>
    <label>&nbsp;&nbsp;<input type="submit" name="Submit" value="Go!" /></label>
  8. Click the X in the upper right corner.
  9. Click Save Changes (VERY IMPORTANT)

You will now have a SLK search box on your sidebar. Those of you a little more advanced with your HTML could paste this into a page and increase the size of the search bar area. The sky’s the limit!